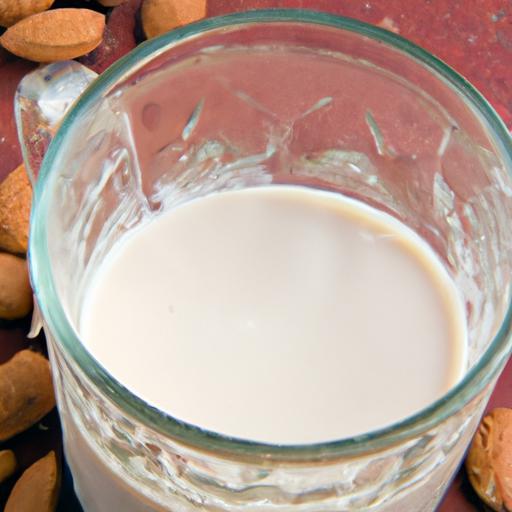
There’s something beautifully satisfying about making your own almond milk from scratch-a creamy, nourishing beverage crafted entirely by your own hands. Beyond the convenience of store-bought cartons, homemade almond milk offers a fresher taste, customizable richness, and the simple joy of knowing exactly what’s in your glass. Whether you’re dairy-free, vegan, or simply curious about crafting this wholesome elixir, this guide will walk you through the effortless steps to create smooth, velvety almond milk right in your kitchen. Get ready to transform a handful of almonds into a luscious, natural treat that can elevate your smoothies, coffee, cereals, and more. let’s dive into the art of making creamy homemade almond milk, where simplicity meets flavor in every sip.
How to Make Creamy Homemade Almond Milk unlocks a world of fresh, velvety goodness you’ll never find in store-bought cartons. This simple guide brings you closer to the essence of almonds-raw, soaked, and blended into a luscious, naturally sweetened beverage that’s as nourishing as it is flavorful. From selecting the finest almonds to mastering the soaking process, you’ll create a silky milk that elevates every sip or recipe you pair it with.
Prep and Cook Time
Preparation: 8 hours (soaking) + 10 minutes (blending and straining)
Cook Time: None required-just chill before serving for optimal freshness.
Yield
About 4 cups (1 quart) of creamy almond milk
Difficulty Level
Easy – Perfect for beginners and seasoned home chefs alike
Ingredients
- 1 cup raw, organic almonds
- 4 cups filtered water, plus extra for soaking
- 1-2 tablespoons pure maple syrup or honey (optional, for natural sweetness)
- 1 teaspoon pure vanilla extract (optional, for warm aroma)
- A pinch of sea salt (to enhance flavor)
Step-by-step Instructions
- Gather the finest almonds you can find. Organic raw almonds are key for fresh, untainted flavor and optimum creaminess. Look for almonds that are plump and free from blemishes for the best results.
- Soak the almonds overnight or for at least 8 hours in a bowl filled with cool filtered water.This softens them,activates enzymes,and reduces bitterness,unlocking that smooth,rich almond essence.
- Drain and rinse the almonds thoroughly under cold water. This step refreshes your almonds and readies them for blending.
- Transfer the soaked almonds to a high-speed blender, and add 4 cups of fresh filtered water. Blend on high for 1-2 minutes until the mixture turns creamy and the almonds are almost ground to a fine pulp.
- Strain the almond mixture using a nut milk bag or a fine-mesh sieve lined with cheesecloth. Squeeze gently but firmly to extract every drop of silky almond milk. The leftover almond pulp can be reserved for baking or smoothies.
- Return the freshly strained almond milk to your blender, and add your choice of natural sweeteners, vanilla extract, and a pinch of sea salt. Blend again briefly to incorporate these flavors fully.
- Pour your homemade almond milk into a clean glass bottle or jar, seal, and refrigerate for at least one hour before serving chilled and fresh.
Chef’s Notes: Tips for Success
- Use filtered water to avoid any off-flavors that tap water might impart.
- Experiment with soaking times. Longer soaking can increase creaminess but should not exceed 24 hours to prevent fermentation.
- For a nuttier taste, toast almonds lightly before soaking. Make sure they cool before soaking, so they rehydrate properly.
- Keep the leftover almond pulp to add fiber and protein to baked goods or homemade granola.
- Adjust sweetness to taste or experiment with natural flavorings such as cinnamon, cardamom, or cocoa powder for exciting variations.
- Consume almond milk within 3-4 days for optimal freshness and shake well before each use.
Serving Suggestions
Enjoy your creamy homemade almond milk chilled as a refreshing drink, or pour it warm over your morning oatmeal or coffee for a silky, dairy-free twist. Garnish with a sprinkle of cinnamon or a few crushed almonds to elevate your presentation.It’s perfect for smoothies, baking, or as a nourishing base for creamy soups and sauces.
| Nutritional Data (per 1 cup) | Value |
|---|---|
| Calories | 60 |
| Protein | 2g |
| Carbohydrates | 3g |
| Fat | 5g |

For an even richer understanding of almond milk’s nutritional benefits, visit the Healthline almond milk guide. Also, explore our detailed article on Best Dairy-Free Milk Alternatives to diversify your plant-based options.
Q&A
Q&A: How to Make Creamy Homemade Almond Milk – A Simple Guide
Q1: Why should I make almond milk at home instead of buying it from the store?
A: Homemade almond milk is fresher, creamier, and free from preservatives, additives, and unneeded sweeteners.Plus, you can control the thickness and flavor to suit your taste buds perfectly. It’s a fun, cost-effective way to enjoy a wholesome dairy alternative!
Q2: What ingredients do I need to make creamy almond milk?
A: Just two essentials: raw almonds and water. For extra flavor and creaminess, you can add a pinch of sea salt, a splash of vanilla extract, or a touch of natural sweetener like maple syrup or dates.
Q3: How do I get the almonds ready for milk-making?
A: Soak your raw almonds in water overnight or for at least 8 hours. This softens them, making them easier to blend and unlocking that rich, creamy texture.
Q4: What’s the secret to achieving a creamy texture?
A: It’s all about the blend! Use a high-speed blender and blend soaked almonds with fresh water for about 2 minutes until silky smooth. Strain the mixture through a nut milk bag or fine mesh cloth for that perfect velvety finish.
Q5: How much water should I use?
A: Typically,a 1:3 or 1:4 ratio of almonds to water works well-a cup of almonds to 3 or 4 cups of water. Adjust depending on whether you prefer a richer milk or something lighter.
Q6: Can I use the leftover almond pulp?
A: Absolutely! Don’t toss it out. Use almond pulp in smoothies, baked goods, granola bars, or even as a natural face scrub. It’s a delicious zero-waste bonus.
Q7: How long does homemade almond milk last?
A: Store it in a sealed container in the refrigerator, where it will stay fresh for up to 3-4 days. Always shake well before using, as natural separation may occur.
Q8: Is homemade almond milk suitable for people with nut allergies?
A: No, almond milk is made from almonds, which are tree nuts. It’s not suitable for anyone with nut allergies. Always seek allergy-amiable alternatives if needed.
Q9: Can I customize the flavor?
A: Definitely! Feel free to experiment with cinnamon, cocoa powder, cardamom, or even a hint of almond extract for a personalized twist.
Q10: Why does almond milk sometimes seperate after refrigeration?
A: Separation is natural as homemade almond milk doesn’t contain stabilizers. Simply give it a good shake before pouring to recombine the creamy goodness.
Ready to blend your way to a dairy-free delight? Homemade almond milk awaits with simplicity, creaminess, and a splash of love in every sip!
in Retrospect
Crafting your own creamy almond milk at home isn’t just a delicious endeavor-it’s a small act of mindful living. Armed with simple ingredients and a bit of patience, you’ve unlocked a world where freshness meets nourishment in every velvety sip. Whether poured over your morning cereal, blended into a smoothie, or savored by the glass, homemade almond milk offers a customizable canvas for your taste buds and a gentle nod to wellness. So next time you reach for a carton, remember: the creamiest, purest almond milk is just a few almonds and a blender away. Cheers to making dairy-free dreams deliciously homemade!